Wednesday, March 2

Two current tricky sewing jobs! Part 2 (suit jacket sleeves and baby's coat)

If you've got here before Part 1, then you'll need to go back to it, or this Part won't make sense!

I got the jacket finished, and was much happier with the results. Just to recap, this was what I did after realizing that I wasn't happy....


 Removed the buttons 
 Unpicked the bottom of the sleeve lining
 Trimmed off about 3/8" of the hem of the sleeve, trimmed away some of the interfacing,
 and cut notches into the hem - all to make the fabric give a bit more
  

Then I re-did everything. I didn't need to completely re-do the mitred corner, I just undid the top of it to allow for the trimming. I sewed the buttons on more loosely this time.

Here is the original sleeve before unpicking -

Original sleeve before unpicking (note that buttons overlap slightly)

And this was after the first attempt. As I said in Part 1 I wasn't happy with the way the underneath is "pulling". (Should have taken a picture of it flat on the table as in the above one to make a proper comparison.)
After first attempt

And here is a proper comparison! This was after my second attempt. I'm happy with this.

After second attempt.

 Pulling eliminated.
After second attempt.

As you can see the buttons overlap each other slightly, but they did in the original. The buttonholes are so close together that it was impossible to get them on without them overlapping.

And that lining that I had originally sewed in incorrectly? 

Incorrect
 It's hard to explain this properly, but basically the lining should have some extra length in it (about 1/2") to give some ease. When you sew the bottom of it in place it will actually pull down over the stitching giving that ease. If you look at sleeve linings in suits you will see that this is how they are done. Ease can also be incorporated into the lining of the back of the jacket by using a centre pleat. I am learning all this as I go along!!

Correct
Re-doing things was a pain but I would always rather do that than not be happy with the job I've done.

I have now given it back to Son-in-law who says it is perfect!

Baby's coat

The story here is that I had bought two £1 wool jumpers from a charity shop. I wanted to use them either in a patchwork blanket that I am making out of squares cut from another wool jumper, or to make a child's coat/jacket. Which idea I chose would depend on what they came out like after washing i.e. how much they shrank and felted. I washed them on a 40 degree minimum wash cycle (that's the one with 40 and one line under it). They shrank and felted just a nice amount. I laid out one of them on the table and thought I could chop down the middle, put in a zip, and perhaps cut off the ribbing at the bottom and bind the edge with something colourful, and Bob would be your uncle - one warm wool jacket for a child of about toddler size.

However, I decided in the end to cut out a proper coat, using this very old pattern which I got free (I think) from Family Circle magazine years ago when it was available here in the UK. I see it was closed down in 2006, according to Wikipedia.


I cut out the 12 month size, needing the pieces from both jumpers (I have quite a bit left over to make something else). I used a shirt - again £1 from a charity shop - for the lining. I would have preferred to use something more slippery, and looked at all the winter coats in the charity shops (vastly reduced at this time of year) to see if any of them would have lining of a suitable colour. None did unfortunately, and as this was supposed to be a make-it-for-as-little-as-possible project, I didn't want to buy new lining. So I bought 4 shirts, and chose the one made of the smoothest cotton. (The others will be for some other project.)

Earlier in Part 1 here I mentioned that there were similarities between the two jobs - shortening the suit jacket sleeves and this baby's coat. The similarity was in the linings, and the subject of "ease". When I had made the lining of the coat, and joined it to the outer, I found that the sleeve linings were
much too tight. At this point I felt like giving up and abandoning the project, partly because I had already discovered that when I cut out the yokes (outer and lining), I had cut them to the 6 month size and not the 12 month size! This should have had an effect on the size of the armholes of the body of the coat, but I hadn't noticed because you have to ease in sleeves anyway, and the fabric had stretched quite readily. But I had had to re-cut the lining yokes, guessing where the 12 month size lines would have been. So I was already a bit cheesed off! I should have removed the whole lining and re-cut the sleeves, with ease incorporated, to make them fit better. But to be honest I didn't know if I could do that successfully. [Apologies that that paragraph has centred itself].


I really didn't want to give up as I did think this could be a nice coat if only I could find some way to sort out the problem.So what I did was to unpick the sleeve linings almost right up to the sleeve seam, and then insert a piece to give that ease.

In the picture below you can see just how much the lining pulls apart and therefore how much more fabric is required to fill in the gap.

Lining unpicked
In the picture below I have pinned in the extra piece, and also added some to the bottom (by machine) to give extra length - just like the suit jacket sleeves had.

Extra pieces inserted and added to bottom.
I handstitched the inserted piece.


After turning the coat right sides out, I bound the neck and sleeve edges with bias (cut from the shirt), and then topstitched by hand all round the edges. I've just realized that this picture has different buttons on to the finished one later in this post! In fact at this stage I was just laying buttons (from the hundreds I have!) on top of the coat to see which ones I liked best. In the end I chose the blue ones in the last picture.


Underneath them I sewed two large poppers.

I would like to sew two more poppers, to hold the coat closed further down, but don't really want to add more buttons (and haven't got any more the same anyway!) as it might spoil the look of the coat. However, adding poppers without the stitching showing through is impossible unless I only stitch them to the lining, which wouldn't be ideal as it wouldn't really hold the coat properly in place. More thinking required!


Finished coat!


I have shown it to my daughter, the one who had the gorgeous Lily on Christmas Eve, and she loved it! I thought she might not want it for Lily because of the blue in it, but she does, so if it fits when Lily is bigger then Lily's it is! I hope it does fit; I'm not sure about under the arms. I think if I make any more babies' coats then I'll use another pattern that I've got that's got more room there.

My next sewing project is for a regular customer - making a cover for an outdoor bench cushion.


1000 mile walking challenge

I am now going to keep news of this updated on my "Cycling and walking" page. Go there if you want to see how many miles I've done so far! It is a challenge to keep motivated; I love walking but find doing an hour or so (about 3.2 miles) a day gets a bit boring - although I have purposely found new routes I do end up doing the same ones. I have thought about doing fewer longer walks, but actually making myself walk every day is good for me. Dilemma..... 

I have managed now to embed a Strava widget (top left hand side bar) for those of you who are into Strava. For some reason it's not showing up what I've done in the last few days, so I hope it rights itself somehow. [Note: Have realized that Strava is not including my walks on the widget, although they are visible to me and my followers. It does however show my bike rides so I'll leave the widget there!]

It has occurred to me recently that a lot of people might read a blog and not think about signing up to get regular updates. Or not know how to sign up. If you are interested in receiving updates then you can do so by filling in your email address on the right hand side bar, or by clicking on the Google Plus thingy. To be honest I'm not all that sure I know what Google Plus is for....... I would have to remind myself! I usually sign up to blogs by email and then I know exactly what I'm doing!

Till next time

Lizzie

Monday, February 22

Two current tricky sewing jobs! Part 1

When I am working on something that I think I might include in the next blog post, I usually wait until it's all done and dusted and I'm happy with the result! But this time I thought I would do a post mid-way through the tasks and let you in on the difficulties I am having, which I can in all honesty also call challenges, as it's through these sorts of difficulties that I have learnt a lot over the past three years or so.

I am currently shortening the sleeves on my son-in-law's suit jacket, and at the same time am making a baby's coat from two felted jumpers, using an old shirt for lining. Let's talk about the jacket sleeves first....

When I first started doing paid sewing jobs, one of my first was to take out the trousers of a morning suit. They had a fish tail back - I had never heard of this and only found out that that was what it was called when I did some googling to find out how to do the job! I nearly turned the job down initially as my first thoughts were "Oh gosh can I do this? What if I wreck the trousers?" The gentleman in question was local and wanted them for a wedding abroad the next week, so, as they say, no pressure then...... But I knew that if I didn't accept the challenge then I'd never know if I could have done it or not. So I did, and I did! I learn a lot from it, and from subsequent alterations to other garments. It is usually a case of seeing how the garment is constructed, then unpicking and re-constructing. That is slight oversimplification...... but I would say to anyone who is fairly competent in dressmaking that if I can do it then so can you. Although I would also say that alterations are more difficult than making an original garment.


The jacket

The sleeves have four buttons with non-working buttonholes, and a vent, and some top stitching. Son-in-law wanted them shortened by 3 cm, and as this would have meant the bottom button was far too near the bottom of the sleeve, he asked if it would be possible to remove the bottom buttonhole and make a new one at the top. I couldn't see why not, so this is what I set out to do (no googling at this stage!) although actually I decided it would be necessary to remove the bottom TWO buttonholes and make two new ones at the top, in order for the sleeve to look right.

[Note: I am having trouble getting the photos to insert in the right place. I don't know whether it's me or Blogger. It has happened with this post and the last one. So they aren't necessarily in the best order! If anyone else is having this trouble please let me know!]

Sleeve as it was originally

When I am doing something like this I take pictures all the way through (although I have not included them all here) so that I have a record of how the garment was constructed to allow me to reconstruct it correctly.


Inside of sleeve showing mitred corner


Sleeve unpicked. Tacking shows where new hem needs to be. Only one buttonhole removed at this stage.

I very carefully measured and marked (to the millimetre) where the two new buttonholes should be, marking them with tacking thread, but as you can see in the picture below I still did not get them exactly the same length. I can only excuse that by saying that when I'm working with black fabric I find it really difficult to see what I'm doing, so starting and stopping exactly where I should have was difficult to say the least. However the incorrect length won't matter too much once the buttons are back on. (It doesn't help that the light on my machine is not working so I am having to try and point a table lamp in the right direction.)

Getting the buttonhole stitching to match was tricky too - again I haven't succeeded one hundred percent, but I'm fairly happy with them. Hopefully people won't be bending down and closely inspecting my son-in-law's sleeves, just glancing at them from a distance.....

Two new buttonholes made at the top, and some of new top stitching done

The next pic shows the corner re-mitred and the sleeve lining sewn back in. However, I have done the latter incorrectly - I shall re-do it and show how it should be done later on. The balloon fabric is 1980s Habitat and is my home made ironing board cover!


[Having awful trouble with doing this post! Just tried to put a caption to the above pic and the pic jumped above the previous one! Aaarrrrgggghhhh!]

I finished the two sleeves and hung the jacket up - see above pic -  to see how they looked. I wasn't very pleased - I'm not happy with the way the flap-over bit of the sleeve i.e. the bit with the buttons on -  seems to be pulling on the other bit. Being a bit of a perfectionist I thought I'd try and see if I could eliminate that pulling.

This has meant doing the following (again!)

  Removing the buttons 
  Unpicking the sleeve lining

And also doing this:

  Trimming off about 3/8" of the hem, and trimming away some of the interfacing, to make the fabric   give a bit more.
  Cutting notches into the hem

Turning up the sleeve is similar to when you turn up a trouser hem that is narrower at the bottom       than the point above to which you are sewing it. Somehow you have to ease it to fit. The trimming   and the cutting of the notches were both intended to provide this ease.

And then redoing everything!

I am now at the point of re-attaching the lining of the second sleeve. I shall return when it's all done and show pics!

Lizzie (will I be in son-in-law's good books at the end of all this??!!)


Thursday, February 4

A jumble of recipes, walking and sewing (in that order)


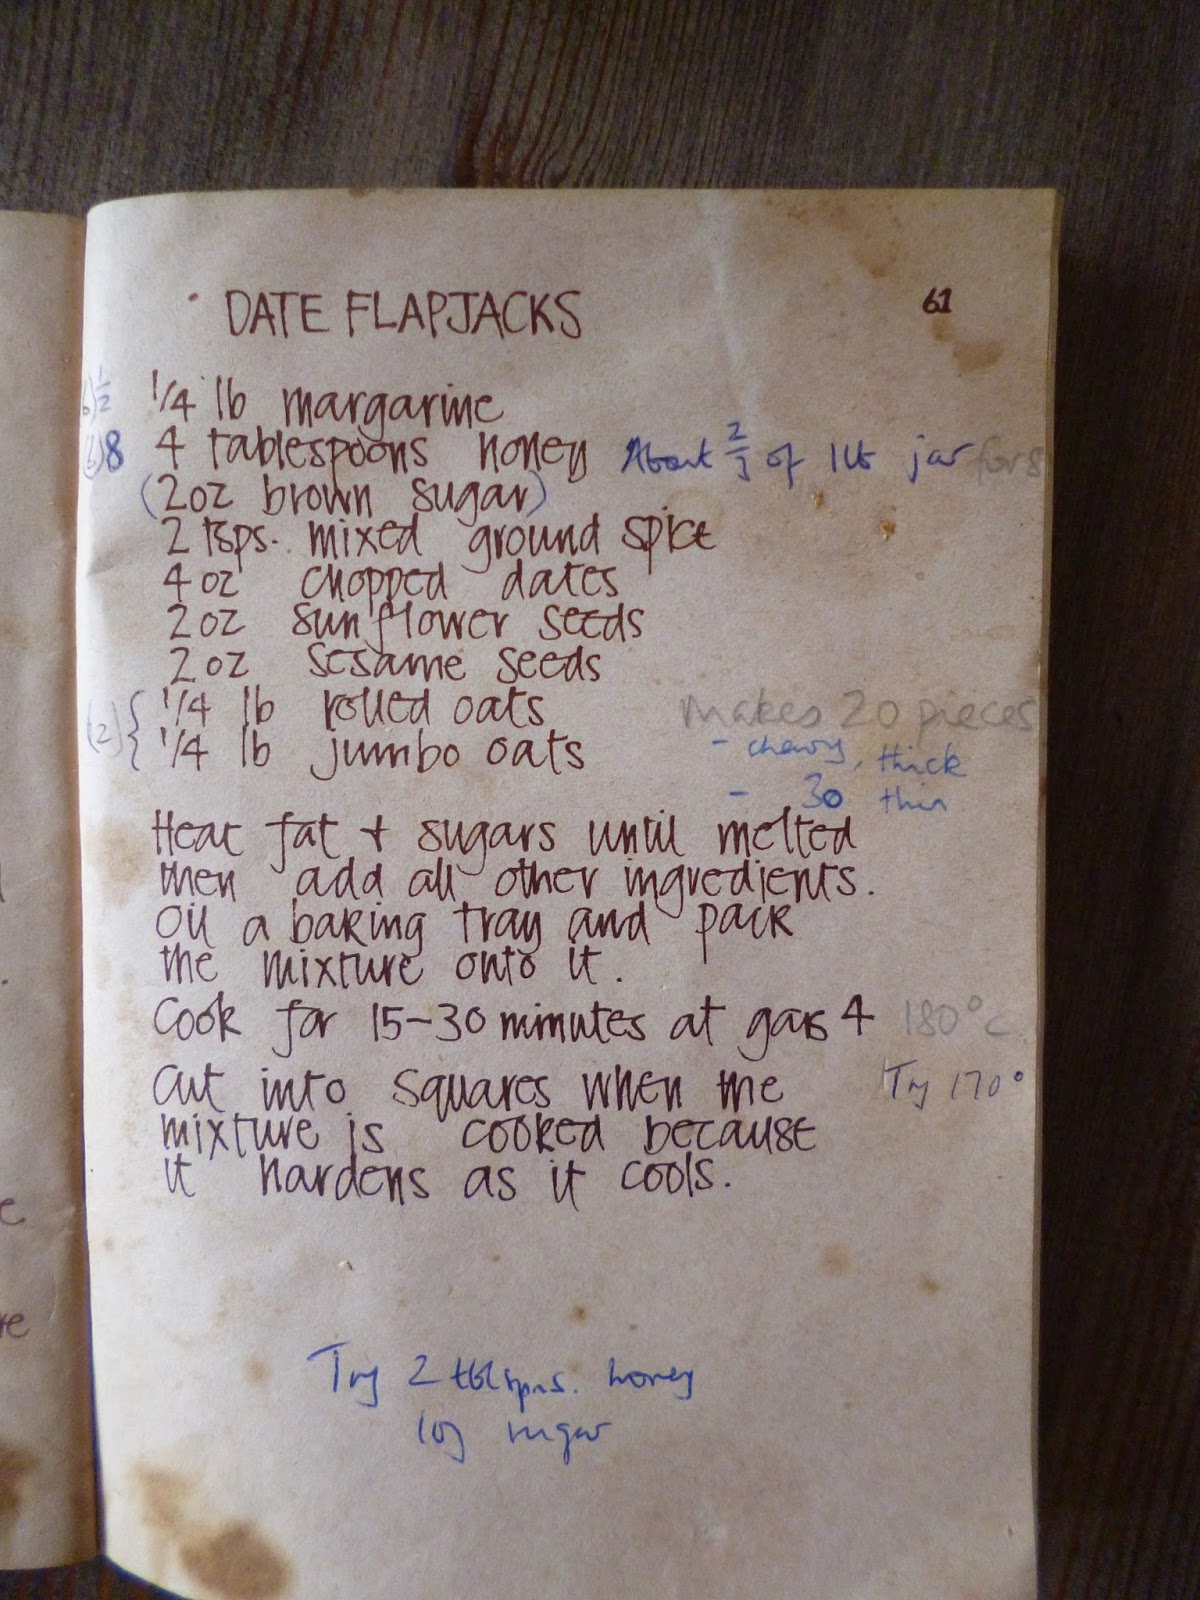
In my last post I mentioned two favourite recipes, a chocolate cake and flapjack. I've since made both again and here are the recipes, plus another one for a nut loaf/nut burgers.

First up, the flapjack recipe. To give credit where credit's due, it comes from the York Wholefood Restaurant Cookbook , which my sister gave me in 1981. Having been at York University she knew this restaurant. There is no publication date inside, but I would describe it as a very 1970s type of wholefoodey recipe book!

As you can see from the food stains and annotations I've made it quite a lot. I think it is excellent for taking on cycling trips, providing the sort of necessary nutrients that you need for energy. I have tried missing out the sugar but I do include it now whenever I make it as I find it all holds together better. You can vary what goes in, e.g. this time I hadn't got enough dates, so I added cranberries, and a few figs, although I have to say I prefer it with the amount of dates the recipe says.


Looking for the easiest chocolate cake recipe ever, with little washing up? No greasing or lining of tin? Even mix it in the tin? Look no further!! It's called Wacky Cake and is taken from the Dorset Farm and Country Holidays Cookery and Country Pursuits book, which we bought on holiday in 2004. It is unbelievably easy and is lovely as cake or as a pudding. I love it with my elderberry sauce poured over it, plus cream.


This next recipe says Nut Burgers in my own recipe book (below) but I made it as a loaf this time. It does take a while to grate the carrots and do the breadcrumbs (I haven't got any electrical appliance to do the latter so just crumbled the bread by hand) but the end result is very, very tasty - quite sweet. This time I also added a grated parsnip. I think this recipe was from a Good Housekeeping book, possibly Cooking for Vegetarian Children, given to me by my late mum when one of my daughters was vegetarian for a while. I have always cooked lots of non-meat things. Once when we had family visitors (on husband's side) for a meal not long after we were first married, I cooked something with lentils, and because of this one of them later asked my husband (not me directly!) if I was vegetarian, as if anyone who ate such things must be vegetarian.... 


The nut burger mixture

Flapjack and Wacky Cake (and Deva Bridge yogurt maker in background - see below)

I actually got seriously interested in food when I moved to Bristol in the 1970s and worked in what was then George's bookshop at the top of Park Street. I think I was feeding myself a fairly good diet but I began to get some digestive problems (I won't go into detail but let's just say that there was some wind involved, and a need to spend a rather embarrassingly long time in the smallest room....) and so took myself off to the doctor. Now, this was the 1970s remember, and what was in dietary fashion then? You've guessed it, bran................. There was nothing physically wrong with me, so I was told to eat 2 tablespoons of bran on my muesli every day and see if that helped. Well it did, but it ruined my muesli! 

However, this triggered my interest in healthy eating. I learnt that "brown" bread wasn't the same as "wholemeal" and found a nice baker somewhere on my way to work that made the latter. I think Bristol was, and certainly is now, quite a foodey place. I read all sorts of books (obtained at discount of course) a lot of which seemed to go on about adding bran to everything and eating wholemeal bread, but many of which taught me about what we really need to eat to be healthy. I gave up on the bran after a while, and was fine, and indeed probably better without it. I now think, and I'm sure this aligns with modern dietary advice, that wheat bran is not the way to go to get more fibre in your diet, but that a good diet that includes lots of fruit and veg will give you all the fibre you need. And if you do want bran, oat bran is much better.


I read about the benefits of natural yogurt and started making it in a thermos flask and eating it every day on my muesli. I still make it - in a Deva Bridge yogurt maker, which is just an insulated container really, very simple, not electric - you can't get them any more. I also make kefir now, which is even easier to make and supposed to be even more beneficial than yogurt. [Why has this paragraph centred itself??]

A spell at agricultural college doing a course called National Certificate in Agriculture with Home Economics taught me a lot more, about health and disease in humans and animals, and the alimentary canal - what goes in at one end (the mouth) what comes out at the other (you know what it's called...) and what goes on in between! It's fascinating stuff!

More recently, I have got interested in what you need to eat in order to be able to keep going while walking and cycling. Something like the flapjack is definitely a good thing to take with you, and I'd rather make and take my own, as it's a lot cheaper and I know exactly what's gone into it. When I did a long ride last year, about 55 miles, I experienced a decided dip in energy levels about 9 miles from home, commonly referred to as bonking (oh go on then, have your giggle.....now be quiet and read on). My husband had joined me for about half the distance and at this point I said to him "I've got to STOP HERE. No I cannot carry on even though it's downhill all the way to Lambourn!" (where I could buy more food). At that point I rested, ate more of the fruit and nut mixture I had with me (wanting more of the fruit than the nuts) and drank more water, and then we cycled on and in Lambourn I bought chocolate brownies and orange juice, and rested while I ate it. I would never normally eat that combination of foods, but I instinctively felt that that was what I needed, and after that I was OK on the 6 miles home. It made me think about what to eat, and when to eat it, on a long cycle ride.

1000 mile walking challenge (over at Life after Money here):

 I am doing fairly well with the 1000 miles walking challenge. I am going out nearly every day and mostly I do an hour's walking which is about 3.2 miles. I tend to sew in the morning when the light's good, have lunch and then go out. Sometimes I go further, for instance walking to town (just over 5 miles away, takes about 1 1/2 hours) to go shopping, and then coming home by car with husband on his way home from work. I do have to force myself out sometimes, as I find I get bored with the same routes and it is quite difficult to think of new ones of roughly the same distance. It will be better when the local footpaths are not so horribly muddy. And talking of mud, I made these gaiters a long time ago but have only just started using them. 


I made them from the sleeves of a waterproof coat that I found one day - the cuff is at the bottom and I put elastic through a casing that I made at the top. I have used them a lot, to prevent my trousers getting muddy, but I have discovered that once my legs warm up they get sweaty inside, probably because the fabric is just a cheap one, not like the more technical stuff you can get. So I'll be trying to dream up a way of making something (cheaply) more breathable. I would also make them so that I can fasten them round my legs, rather than having to pull them over my feet.


For some time I have been using the website Strava to upload my walks and rides to (my elder son got me onto it) and if you are a fellow user you can follow my walks, as I have now added a Strava widget to the left sidebar. [Note: Adding widget has gone wrong, will try again another time!] Warning - you can get Stravaddicted! My soon to be daughter-in-law refused to use it for a long time but then my son gave her his old Garmin watch thingy, enabling her to upload rides and runs to Strava, and she is now Stravaddicted.... I did get a bit Stravaddicted when I first got my Garmin cycle computer, trying to beat people on segments, but then I gave up being competitive and just thought - "oh whatever! I just want to enjoy cycling and I don't care if other people are faster than me!" Mind you I do still get quite a thrill from knowing that sometimes younger people than me are slower.......

Rubbish!

On several occasions over the years,  I have reported dumped rubbish that I see on my walks to a contact on the council. Yes, I have my own personal rubbish contact on the council. Me being the curious person that I am I poke about amongst the rubbish seeing if there's anything interesting there, and if there's anything to identify the dumper I then photograph everything and send the pic to my contact, who then takes appropriate legal action. I have also on two occasions found stuff that was the subject of a burglary. So it's definitely worth being nosey!

Sewing jobs

That is, the paid ones, are continuing to come in regularly - indeed this winter they have not slowed up as much as last year. The army job (sewing on hundreds of badges) has not come in yet as apparently the badges have not yet arrived. I have heard a rumour that this is not unusual for the army...

A customer asked me to shorten some salopettes - very tricky to get it right. I had to tack the layers of fabric first to keep them in the right place while I did the tuck. There was an inner lining below the knee, so I had to do the tuck above the knee. I got them the same length but the tuck isn't in quite the same place on each leg.


Inside of salopettes showing layers tacked together


Salopettes finished

 I also shortened some lined waterproof trousers for the same customer. Not a difficult job but the fabric was the sort which feels horrible to my winter hands i.e. rough!


I made this purse from an old pair of my shoes! They were a pair of the mocassin type that became uncomfortable so I cut the backs off to wear them indoors (I hate slopping around in slippers), but they still weren't comfortable so then I cut them up completely and made this purse from some of the pieces. It's what I call an emergency money purse - one I would take with me on a bike ride or walk when I don't want to take my normal full-of-money-and-credit-cards (oh yes!) one with me. 


Below is the back. In order to stitch these two pieces together, and so that the top could fold over the front,  I had to do a line of blanket stitch along each corresponding edge and then stitch in and out of the stitching to hold them together. Hope that's clear.... I used an ancient reel of linen thread that I had acquired from somewhere. The stitching is not very neat or even but it does the job.

Back of purse

I cut a slit in the flap and inserted an old jeans button in it, and then cut another slit in the flap as a buttonhole. And Bob's your uncle, an emergency money purse made out of an old pair of shoes - complete with stains!
Front 

And I mended these jeans. The story here is that my husband brought home 4 pairs of a colleague's jeans, all with holes in the crotch/rear area. I did one pair and then Husband took them back to his colleague to get his verdict and see if he wanted me to do the other 3 pairs. He did not want an obvious and visible mend in that area.....


Before. Small hole to right below pocket as well.

 I cut patches to fit the area, matching the direction of grain of the patch to that of the area to be patched, then zig-zagged them round the edges to stop fraying and sewed them in place, round the edge, on the inside. The red lines were where I had drawn the shape before cutting!

Zig-zagged patches sewn to inside


There is a "patching" stitch on my Bernina that I could have used for the darning on the right side, and would have done if I hadn't been trying to do my best and neatest job, but instead I used a straight stitch, going back and forth several times over each area. I was pleased at how it all turned out. Husband came home after taking them in to his colleague and wound me up by making out that he (the colleague) wasn't impressed, but in fact he was very impressed I believe! He wants the other 3 pairs done. 

A note on what I'm charging - I told Husband, give him an estimate of £10-£12 per pair. Husband came home and said I'd said £8-£10. No I didn't! Yes you did! (etc. etc.) (I'll write it down for him next time). Anyway, colleague is getting them for £10 per pair. Going by the time it took (I charge per hour for some jobs, £8/hour) it should have been £12, but never mind.....at least this bloke will be getting the message that it's worth mending things!

Finished mends

Now I'm off to make Husband's sandwiches, so until the next time, cheerio, 

Lizzie