Wednesday, March 23

Making sleeved bibs, eating pizza left on the train and cleaning the bike.

Another bits and pieces post, but hopefully with some useful and interesting stuff. I say that because I spoke to someone recently who thought that bloggers wrote in order to brag about what they did (I don't think she actually read blogs - just got this idea from somewhere). It was always my intention in writing a blog in order to share things with other people that might be useful, because I had learnt so much that way myself.

It always takes me ages to write a post and so I am going to try my best to write this one a bit quicker! (Slow internet doesn't help.) I should add that I will be going back and forth between my sewing room and this sitting room and making shopping bags while photos are uploading. So for the record it is now 10.43 (GMT) on Saturday 19th March. Hopefully I will get it finished before we change to BST - next weekend!


So, on to a current and ongoing project. Bibs.

I was asked my a customer if I could make some towelling, sleeved bibs for her grandchild, and she brought one to show me. From this I made a pattern, although it was a bit tricky as I couldn't cut it up - I just had to draw round it and hope it was roughly right. I then made one up using old towelling, and bound the edges with strips of old t-shirt. I gave it to my customer to see if it fitted the grandchild. It was too big round the neck, but I was a bit flummoxed as to where to take the excess from, so I decided to download this bib pattern and make that. I made it out of old flannelette sheets, using a double layer for the front, and bias binding for the edges, and a Kam Snap (brilliant things, have used them a lot, see here) for the fastening at the back. This was the result -


and the back


Well this was good. It was too big but making it had given me a better idea of how to alter the pattern I had made, which I duly did. Again I made it up in old sheet, and used some bits of cotton ribbing from an already-chopped-up long sleeved t-shirt to make cuffs. This is it -
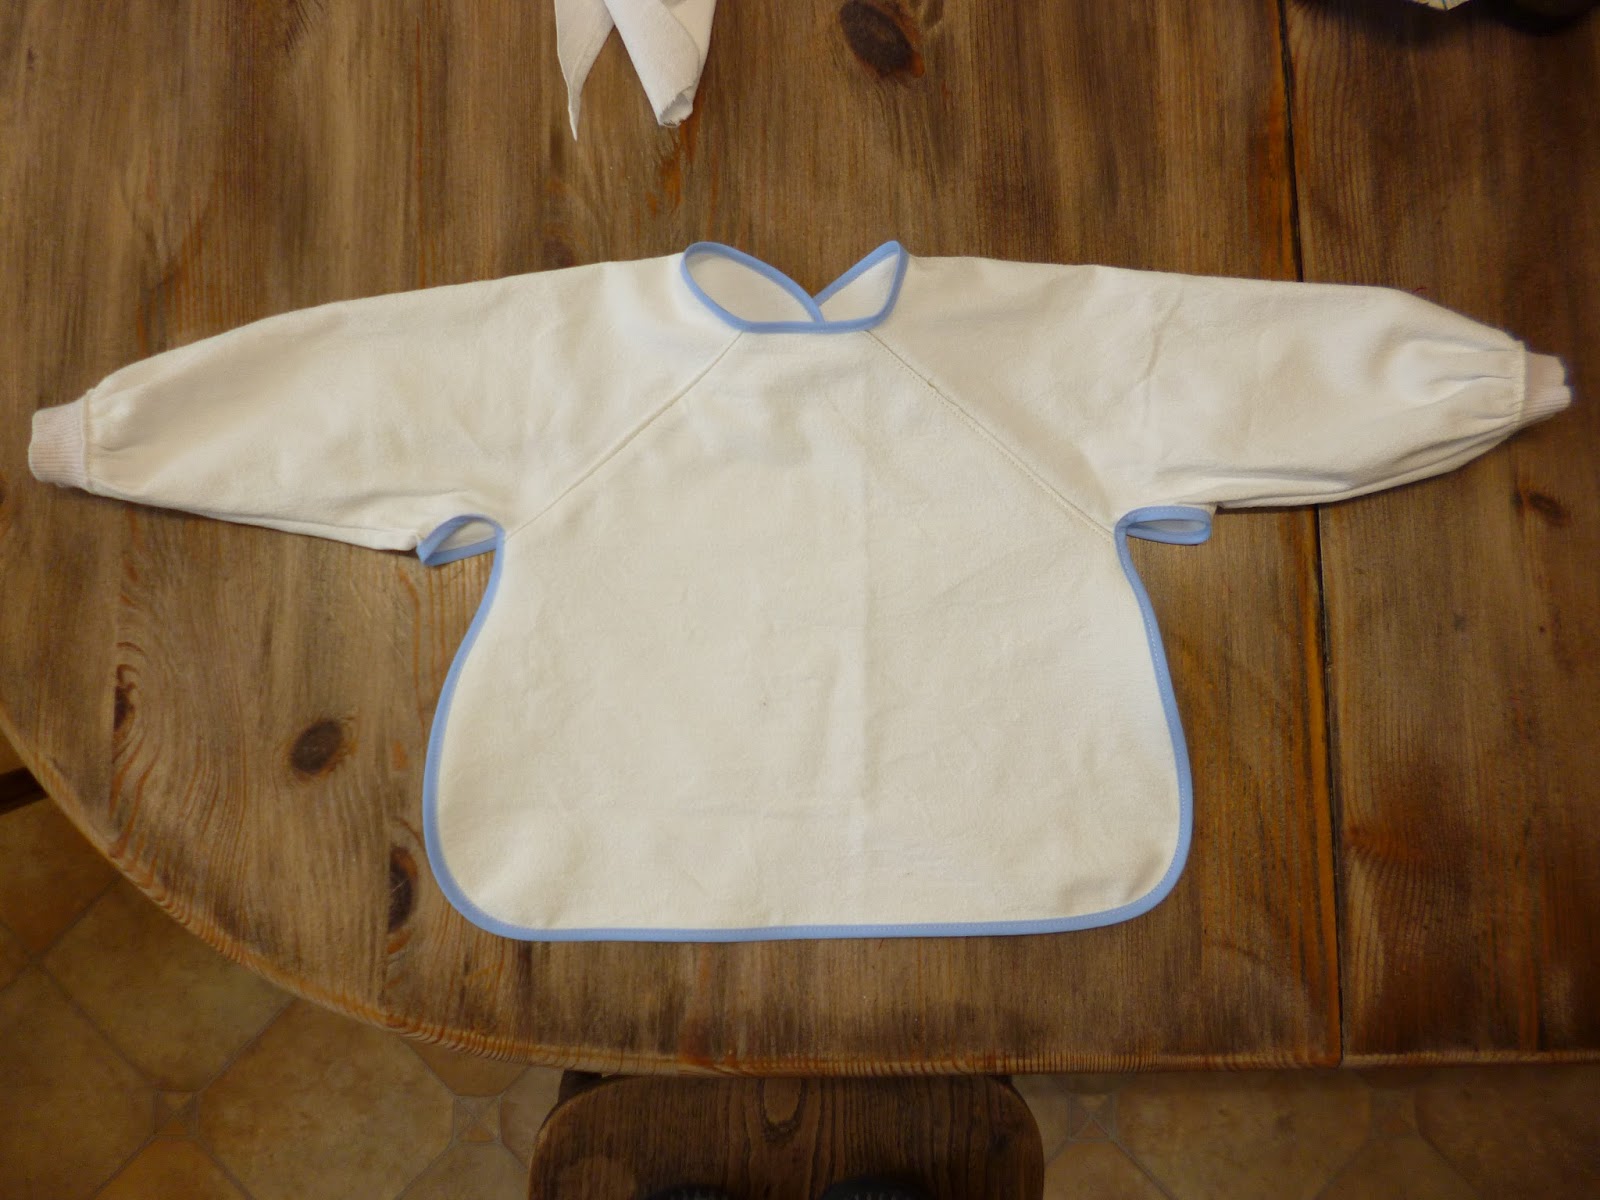
Front

Back


This one's quite good and I have now given it to my customer to see if it fits. If it does I will then make however many she wants using towelling for the front, and something else for the sleeves.


Now, on to a recent trip. I fancied a day out - they don't happen very often and I needed a change! So I thought, well, London? I had a few places in mind to visit, which were -

  Goldhawk Road, for the fabric shops, but when I googled it for up to date information I saw that   there was building stuff going on and that some of the shops had gone.

  V and A Museum

  In-ku shop - where designer Carin Mansfield sells the clothes that she makes (to last!). I came across her recently via the Facebook Make do and Mend group I'm in, and thought "Ooh this is my sort of thing!"

  The Cloth House - beautiful fabrics and haberdashery

  MacCulloch and Wallis - ditto

 which would all have been within walking distance of Paddington station, so it would only have cost me the train fare - £25 - from Didcot which I would have got to with Husband early in the morning as he works there. But the trouble is that once there I would have wanted to spend some money (though definitely would not have in In-ku!) and the train fare wouldn't have left much to spend.....

So I thought - Trowbridge? How did I get from London to Trowbridge in my head you ask? Well, I knew there was a good fabric shop there, plus there are the limitations of where one can get to from here, and I could get there by bus and train. Plus I don't think I've ever been to Trowbridge so why not? And the town's wool and weaving history looked interesting. Husband was off paragliding so I couldn't have the car and I don't much like driving long distances anyway - I much prefer buses and trains (from an environmental point of view and from many other points of view e.g. it's more interesting!). So he took me early in the morning to get the bus (4 miles away) to Swindon station to get the one-carriage train to Trowbridge. Return fare £10.20, at 8.49 am - could have got it for £7.20 if I'd got a later train. I was amazed that for pretty much the whole journey of 35 miles or so the land on the east side of the line was flooded to some extent. (I know it was 35 miles because I had my Garmin on on the return journey! I watched the train speed up to just over 70 mph.)

This was the shop - Fabric Magic. And very good it was too, with a big selection of fabrics (dressmaking and furnishing), haberdashery, and yarns. I didn't buy anything there but asked if there was another fabric shop in the town and the very nice assistant told me that there was a stall in the indoor market, which I duly found. And very good that was too!!! It was called Ann's Trimmings and you can find it in the Castle Place Market. And yes I bought something. I don't often buy new fabric except for specific projects (usually clothing) but I treated myself to this lovely furnishing fabric - £6.99/metre. I did find a bit of a flaw when I ironed it (after washing, to pre-shrink, which it hardly did at all) which was a faint blue line, but I can easily avoid it. For that price I wasn't going to complain (and wasn't going to make a return journey to Trowbridge to do so either!).The tape was also a great find - it is cotton/hemp and was about 85p/metre. I might use it for making some labels.


I had a look round the town and was rather disappointed to find that it was so typical of so many towns in that despite having some lovely old buildings and being quite large it only seemed to have the same old shops that you find anywhere. Hardly any independents. And there was the usual newly built shopping mall which had the usual big cheap chain stores in it. Nearer the station there were a few more newly built shops - Argos, Next and something else. How dull..... There was however a good museum, which had displays about the town's wool and weaving history that I mentioned earlier, and the kind assistant gave me a run down on the local coffee shops.


Now, on the way home, the two girls opposite me left this on the table!!!


It didn't take me long to decide that it would be a waste just to leave it there......either someone else would take it or a member of staff would take it and throw it away. The girls certainly wouldn't be back for it any time soon, or ring up Lost Property and say "Have you found a pizza?" Nevertheless when I put it in my shopping bag I did do so in a slightly surreptitious manner.....

We have a thing called a Remoska (a sort of mini oven that uses very little electricity) so when I got home I cooked it in there and had it for my tea. It was yummy! When I told my daughter that I had found a pizza on the train and eaten it she was a bit worried that it was a half eaten one that someone had left behind. I don't know why my children think these weird things about me.......


This is something else I've been doing, which I tend to put off as I don't exactly enjoy doing it but it's a job that must be done now and then - cleaning my bike. It's great to get and do more cycling again now that the days are getting longer. It's the short days rather than the cold weather that stops me cycling so much in the winter.


Spotless rear cassette and chain before oiling. And the book I got to try to help me do bike stuff myself without having to ask the male experts in the family......


Well, it is now Wednesday and the time is 11.15 GMT, so that's taken me about 4 days! But, in my defence, I have written another post (this one) and published it between then and now.

Hope you've enjoyed reading!

Lizzie


Tuesday, March 22

Altering my Not Your Daughter's Jeans, and cycling in them

I am actually in the middle of another longer post but there I was cycling in my new jeans today, and I thought - oh I'll do a quick post about them when I get home. Actually when I got home the computer said "no!!!!!" but now it's saying "yes OK then" so I'll get on with it.

I've been needing some new jeans for ages. My patched ones, below


really are on their last legs. The bits that aren't patched are extremely thin and although I might patch them some more I did feel the need of a new pair, being slightly scared that the current ones might just develop a split or hole at an embarrassing moment. They cost about £11 in a House of Fraser outlet store several (6?) years ago. They are James Lakeland, which cost a fortune at full price, but they do fit me nicely.

I have had two pairs of this make and price, and it would have been quite reasonable cost wise to have gone back to the shop to see if I could find some more. But I have become such a bargain hunter in recent years that I couldn't bring myself to pay that much, when I know that I can get some in a charity shop for anything from £1 to perhaps £5 - if I'm patient and wait to find the right ones.

So I have been patiently looking for a while. However last week I had the chance to go to a charity shop I can't get to so often, so I whizzed round it, giving everything a quick once over before I got to the sale rail. Don't you just love sail rails in charity shops!! I spotted a pair of jeans which said size 8 inside. I'm a size 10 but I could see these were bigger than an 8, AND - they were Not Your Daughter's Jeans (£150 new I found out later!!!) so, being in a bit of  a hurry, I thought "I'll 'ave them!" (like Burglar Bill, who you will have to google if you haven't read the children's picture story book of the same title) and didn't bother trying them on, because I knew I could probably flog 'em on Ebay if they didn't fit.

Anyway, when I got them home and tried them on they were a reasonable fit, a bit big round the waist but for £1 I wasn't complaining. I discovered that the 8 was American size 8, which is UK 12. I should add that they were like new.

I wore them once last week but did think I'd prefer them if they fitted a bit better round the waist, which was really the only place where they didn't give the fit I wanted. I have taken in jeans before for a customer quite successfully - even though I'd had to google how to do it at the time. But don't you bother doing that, just take my advice and go straight here to a Burda Style page.

This morning I got to work. Apologies for not including a photo of the front before I set to work -  I dived in on unpicking the side seams and forgot. However, here is a photo of the jeans with the side seams unpicked,  moved inwards and tacked in place, and two belt loops removed (don't need those anyway) -


I tried them on and as they weren't quite spot on I drew a line (the red one) to make the stitching line graduate a bit better into the original side seam.


And here are the finished jeans. The side seams look as if they are a bit too near the front, but in fact they look fine when on and I'm really pleased with how they've turned out. I lost a little bit of the pocket opening but not enough to matter. I can still get my hanky in. You can adjust where you stitch so that this doesn't happen if necessary.

A note on the fabric. I have had jeans both of 100% cotton, and of cotton with Lycra. I'd always assumed that the more Lycra there was the more stretchy the fabric was. But this doesn't seem to be the case. My old jeans have got a lot more Lycra in (can't tell you how much as the label is completely faded!) while these new ones only have 1%, and yet they are much more stretchy. I once bought some from Marks and Spencer which I took back because I didn't like the stretchiness of them, so although these feel REALLY stretchy they are great - probably the most comfortable jeans I've ever had. 

Now on to the cycling bit. I had an errand to do in town (collecting kefir grains to restart my kefir cultivating - another blog post one day!)  which is just over 5 miles away, and as the weather was lovely and sunny off I went. Over the winter I don't cycle so much but when I have done "I have been mostly wearing" (a line from the Fast Show, in case you don't know, where the scruffy bloke comes out of his shed and says "This week I have been mostly wearing - a thong" or some such article of clothing) my Craghopper trousers, which are fairly comfortable for cycling in, but sometimes I'd rather be able to wear jeans. I have worn my old ones and they were OK, but not quite so good for legs that are pumping up and down, but these new ones, well, they are sooooooooooooo comfortable on the bike! I think I will be living in them from now on. I do like having legwear that I can wear for sewing (most important to have the correct legwear......)  then out for a walk or on the bike, without having to go and change.  There's a bit of a thing in the cycling world about whether you can cycle comfortably in jeans and some companies make really expensive ones specifically for cycling but honestly, these jeans fit the bill perfectly! I think the back is slightly higher than with a lot of jeans which is good for cyclists. But I wouldn't pay £150 for them!

And now my jeans-clad legs are getting cold in the draught that comes through the door near where our computer is, so I'm off back to the warm and sunny kitchen! I've got a bit into bread making again lately so I might just make some......

Lizzie


Wednesday, March 2

Two current tricky sewing jobs! Part 2 (suit jacket sleeves and baby's coat)

If you've got here before Part 1, then you'll need to go back to it, or this Part won't make sense!

I got the jacket finished, and was much happier with the results. Just to recap, this was what I did after realizing that I wasn't happy....


 Removed the buttons 
 Unpicked the bottom of the sleeve lining
 Trimmed off about 3/8" of the hem of the sleeve, trimmed away some of the interfacing,
 and cut notches into the hem - all to make the fabric give a bit more
  

Then I re-did everything. I didn't need to completely re-do the mitred corner, I just undid the top of it to allow for the trimming. I sewed the buttons on more loosely this time.

Here is the original sleeve before unpicking -

Original sleeve before unpicking (note that buttons overlap slightly)

And this was after the first attempt. As I said in Part 1 I wasn't happy with the way the underneath is "pulling". (Should have taken a picture of it flat on the table as in the above one to make a proper comparison.)
After first attempt

And here is a proper comparison! This was after my second attempt. I'm happy with this.

After second attempt.

 Pulling eliminated.
After second attempt.

As you can see the buttons overlap each other slightly, but they did in the original. The buttonholes are so close together that it was impossible to get them on without them overlapping.

And that lining that I had originally sewed in incorrectly? 

Incorrect
 It's hard to explain this properly, but basically the lining should have some extra length in it (about 1/2") to give some ease. When you sew the bottom of it in place it will actually pull down over the stitching giving that ease. If you look at sleeve linings in suits you will see that this is how they are done. Ease can also be incorporated into the lining of the back of the jacket by using a centre pleat. I am learning all this as I go along!!

Correct
Re-doing things was a pain but I would always rather do that than not be happy with the job I've done.

I have now given it back to Son-in-law who says it is perfect!

Baby's coat

The story here is that I had bought two £1 wool jumpers from a charity shop. I wanted to use them either in a patchwork blanket that I am making out of squares cut from another wool jumper, or to make a child's coat/jacket. Which idea I chose would depend on what they came out like after washing i.e. how much they shrank and felted. I washed them on a 40 degree minimum wash cycle (that's the one with 40 and one line under it). They shrank and felted just a nice amount. I laid out one of them on the table and thought I could chop down the middle, put in a zip, and perhaps cut off the ribbing at the bottom and bind the edge with something colourful, and Bob would be your uncle - one warm wool jacket for a child of about toddler size.

However, I decided in the end to cut out a proper coat, using this very old pattern which I got free (I think) from Family Circle magazine years ago when it was available here in the UK. I see it was closed down in 2006, according to Wikipedia.


I cut out the 12 month size, needing the pieces from both jumpers (I have quite a bit left over to make something else). I used a shirt - again £1 from a charity shop - for the lining. I would have preferred to use something more slippery, and looked at all the winter coats in the charity shops (vastly reduced at this time of year) to see if any of them would have lining of a suitable colour. None did unfortunately, and as this was supposed to be a make-it-for-as-little-as-possible project, I didn't want to buy new lining. So I bought 4 shirts, and chose the one made of the smoothest cotton. (The others will be for some other project.)

Earlier in Part 1 here I mentioned that there were similarities between the two jobs - shortening the suit jacket sleeves and this baby's coat. The similarity was in the linings, and the subject of "ease". When I had made the lining of the coat, and joined it to the outer, I found that the sleeve linings were
much too tight. At this point I felt like giving up and abandoning the project, partly because I had already discovered that when I cut out the yokes (outer and lining), I had cut them to the 6 month size and not the 12 month size! This should have had an effect on the size of the armholes of the body of the coat, but I hadn't noticed because you have to ease in sleeves anyway, and the fabric had stretched quite readily. But I had had to re-cut the lining yokes, guessing where the 12 month size lines would have been. So I was already a bit cheesed off! I should have removed the whole lining and re-cut the sleeves, with ease incorporated, to make them fit better. But to be honest I didn't know if I could do that successfully. [Apologies that that paragraph has centred itself].


I really didn't want to give up as I did think this could be a nice coat if only I could find some way to sort out the problem.So what I did was to unpick the sleeve linings almost right up to the sleeve seam, and then insert a piece to give that ease.

In the picture below you can see just how much the lining pulls apart and therefore how much more fabric is required to fill in the gap.

Lining unpicked
In the picture below I have pinned in the extra piece, and also added some to the bottom (by machine) to give extra length - just like the suit jacket sleeves had.

Extra pieces inserted and added to bottom.
I handstitched the inserted piece.


After turning the coat right sides out, I bound the neck and sleeve edges with bias (cut from the shirt), and then topstitched by hand all round the edges. I've just realized that this picture has different buttons on to the finished one later in this post! In fact at this stage I was just laying buttons (from the hundreds I have!) on top of the coat to see which ones I liked best. In the end I chose the blue ones in the last picture.


Underneath them I sewed two large poppers.

I would like to sew two more poppers, to hold the coat closed further down, but don't really want to add more buttons (and haven't got any more the same anyway!) as it might spoil the look of the coat. However, adding poppers without the stitching showing through is impossible unless I only stitch them to the lining, which wouldn't be ideal as it wouldn't really hold the coat properly in place. More thinking required!


Finished coat!


I have shown it to my daughter, the one who had the gorgeous Lily on Christmas Eve, and she loved it! I thought she might not want it for Lily because of the blue in it, but she does, so if it fits when Lily is bigger then Lily's it is! I hope it does fit; I'm not sure about under the arms. I think if I make any more babies' coats then I'll use another pattern that I've got that's got more room there.

My next sewing project is for a regular customer - making a cover for an outdoor bench cushion.


1000 mile walking challenge

I am now going to keep news of this updated on my "Cycling and walking" page. Go there if you want to see how many miles I've done so far! It is a challenge to keep motivated; I love walking but find doing an hour or so (about 3.2 miles) a day gets a bit boring - although I have purposely found new routes I do end up doing the same ones. I have thought about doing fewer longer walks, but actually making myself walk every day is good for me. Dilemma..... 

I have managed now to embed a Strava widget (top left hand side bar) for those of you who are into Strava. For some reason it's not showing up what I've done in the last few days, so I hope it rights itself somehow. [Note: Have realized that Strava is not including my walks on the widget, although they are visible to me and my followers. It does however show my bike rides so I'll leave the widget there!]

It has occurred to me recently that a lot of people might read a blog and not think about signing up to get regular updates. Or not know how to sign up. If you are interested in receiving updates then you can do so by filling in your email address on the right hand side bar, or by clicking on the Google Plus thingy. To be honest I'm not all that sure I know what Google Plus is for....... I would have to remind myself! I usually sign up to blogs by email and then I know exactly what I'm doing!

Till next time

Lizzie