Saturday, April 27

Singer 411g and the mystery problem with the cam stack

I bought this machine last year via Facebook marketplace, recognising the model as one of Singer's best. It's a slant needle model and does chain stitch. In the home of the person I bought it from the machine was ready for me to try out, but it was on the floor; the person was foreign and communication was not all that easy, so after merely pressing the pedal to see if it went, and fiddling with the knobs and levers and presser foot, to check that they moved, I bought it. The only attachments with it were one foot and one special disk. It did have a sticker on it showing that it had been serviced a few years ago.

I then left it for quite a few months as other things had to take priority, plus to be honest I think my doing-up-machines mojo had got up and gone for a while, but once I got it out again the mojo came back. I have since bought two other machines, a Harris Automatic and a Singer 201 treadle in a very nice Enclosed Cabinet No 51, so my case of VSMA (Vintage Sewing Machine Addiction) was clearly just in remission.....


Usual place for machines that I'm cleaning up i.e. the kitchen table - 


I bought a manual from Helen Howes; I know I could have downloaded one for free but this time I wanted a genuine Singer one. I cleaned the machine, oiled it, greased the gears, and tested out the stitches. All was looking good. 

This machine has a stack of cams, which are the metal disks that enable the machine to produce the different stitches. I have a cam stack on the Bernina 801 that I use, but I have never needed to do anything to that, and I have had no experience with working on cam stacks on other machines. I watched this video How to clean the cam stack on Singer 401a - a very similar machine to the 411g but without the ability to do chain stitch, and it seemed a straightforward process so  I went ahead and took mine out and cleaned it. For reasons that will become clear, I just wish I had taken photos of the cam stack before I removed it.

Cam stack in bits before cleaning -


Cam stack after cleaning (we'll come back to the arrows in a minute) -

PIC 1

Cam stack back in the machine -


Now, observe - there is a wiggly spring clip (right hand arrow in pic 1) that should be held in place by that screw (left hand arrow in Pic 2, correctly termed the stud I believe). That screw should  hold down that clip, but on mine it doesn't. It should be sitting right down on it and there shouldn't be that gap under the top of the screw. 

Here is the cam stack from another machine; this is what that screw and clip should look like - 

Someone else's machine


I didn't know this until I went to try out the one special disk that came with it; it worked at first but then popped off the top, meaning the machine was no longer doing that particular stitch.

I asked on the Vintage Singers group on Groups.io (used to be Yahoo) if anybody could help; someone sent me some photos of the top of the cam stack on her machine so I knew mine wasn't right. I contacted Dan Hopgood (good blogger on vintage sewing machines in the UK) knowing he had one of these machines and he very kindly removed the cam stack from his machine, took it apart, gave me measurements I asked for and sent me photos. Everything on his machine seemed to be identical to mine. I took the cam stack in and out, in and out, and took it to bits again and again, but it seems that it is impossible to get that screw down far enough on my machine in order for it to hold that clip in place. Total mystery.

This is why I wish I'd taken pictures before I took the cam stack out, so that I knew whether or not it was like this to start with.

I plan to sell this machine but don't want to do so until I have sorted this mystery out, as even though the stitches that don't involve the special disk work fine I want to be able to sell it with that disk working properly. There are several other disks that go with this machine (how does this happen -  attachments getting separated from machines?!) and some future buyer may well want to to buy extra disks and use them.

So - I'm rather hoping that somewhere out there is someone who will read this post and solve the mystery for me!!


Monday, April 1

Tensioning my Brooks B67 saddle following severe discomfort!

As an introduction, this was my Brooks B67 when I first got it in May last year. I had bought it for my Koga aluminium touring bike. Once I'd got the height and tilt adjusted correctly for me, it soon became very comfortable. In this photo you can see that the back is fairly level, while the nose tilts up a fair bit, which is how I had read you were supposed to set them up. Tensioning was something I thought I would forget about for the time being, and that I would know when to do it, if at all. 


May 2018


These photos were taken about two months later in July.  As you can see there is still very little sign of sit bone impressions.


July 2018


July 2018

It was so comfortable that on a trip last year (read the first episode here) of 4 days cycling, I only wore padded undershorts on one of those days, riding 35 - 45 miles each day. The only slight soreness I had was under my sit bones. I kept count of the miles I did on it, until September when I reached over 600 miles.

Around about November time I noticed that the bike generally didn't seem quite as comfortable as it had done, although this thought was just a germ of something at the time - you know how you notice something but it hardly registers in your brain? Well, I carried on riding this bike but rather subconsciously chose to ride my steel Trek more often than before, realizing that it was a lot more comfortable going over bumps in the road. I tend to use the Trek for shopping and shorter trips, and use the Koga for longer trips, but as I don't do very long trips in the winter it didn't matter too much that the Koga was becoming uncomfortable. 

The discomfort was in the frontal region.....  I even bought some of these padded knickers - Equetech Dressage Briefs - because you can get them with the padding just at the front. They are actually very comfortable, and I like them because they are mainly cotton. They make a good alternative to cycling shorts/undershorts, although I found the padding to be a bit firmer than my other padded shorts. But to be honest they didn't really help a lot, and as I hadn't needed them before I couldn't see why I needed them now!

However, a couple of  a couple of weeks ago I went out on a ride of about 28 miles on the Koga. I didn't wear any padded undershorts, reasoning that perhaps I had just got too soft! But the discomfort was bad...... too bad to put up with any longer. I couldn't even go over those thickly painted lines on the road designed to reduce your speed without slowing right down and lifting off the saddle. And, although the saddle had always tended to creak slightly (and I know this is a common thing with Brooks saddles) it hadn't bothered me before, but on this day it drove me up the wall! 

Then I thought that perhaps I was running my tyres too hard. I don't pump them up excessively hard but I have always tended to think that harder was better than softer, so I thought they might well be too hard. I investigated the matter.... One of the best articles I read was in the Breton Bikes blog. I read it all and then reduced the pressure in my tyres accordingly. However it still didn't make much difference to my comfort level. But as I was pfaffing around doing the tyres I suddenly noticed that my saddle had now gained very obvious sit bone impressions, and the sides were flaring out a bit. 


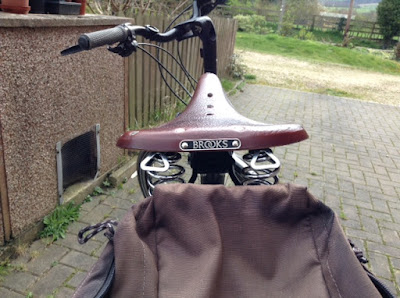
Here are some pics -


March 2019, before tensioning


March 2019, before tensioning

It's hard to really get a good photo that shows the difference between when I first got the saddle and now, but believe me there really was quite a big difference! And that's when the penny dropped......it must be time for tensioning!! 

I was told as a child by one of my sisters, in the teasing way that siblings do, that I was "slow on the uptake" and it has only been in recent years that I have come to realize that that is not because there is something wrong with my brain but just because I think about things a lot, and more often than not that thinking results in my understanding something better than if I had perhaps been quicker on the uptake. So, although it had taken me a long time to realize what the real problem was, I had learnt a lot about tyre pressures along the way.

First I attempted to turn the bolt on the tensioning pin with the saddle still on the bike. I certainly didn't want to remove the saddle having taken so much trouble last year to get the angle right. Then, once again proving my slowness, another penny dropped when I looked at photos on the internet of other people's Brooks saddle and I realized that I could just remove the seat post with the saddle still on it! I made sure I could see the mark on the seat post that I had previously put there to make sure I put it back at the right height. I turned the nut, although thought that the bolt was turning with it (as others have said it sometimes does) but Handy Helpful Husband said it wasn't and I finally succeeded in the tensioning! I rode it around, did it a bit more, and then - rode last Saturday for a very comfortable 48 miles!! With no padding!! Oh the bliss of a comfy bike again! AND - the creaking has largely gone. I don't mind a little creaking....

I meant to take a photo of the tensioning bolt after I had done it, to give the exact position of the nut on it, but in my eagerness to try out the saddle I forgot. I get infuriated sometimes when I am looking at photos of this sort of thing on the internet but can't quite make out exactly what is what, or where something is in relation to something else, so apologies to anyone reading this for whom my photos are not precise enough! I hope you can see in this one that I took afterwards roughly where the nut is. I'm really not sure how much I actually turned that nut in the end, but it was definitely more than just a quarter turn, which is what I have seen recommended as the starting point. By all means start with a quarter turn, but don't be afraid to turn it more.


I also decided, despite having wanted to be sure of keeping the saddle in its original position, that I wanted to tilt the nose down a bit, although  again it's hard to show in the photo below that it's any different to how I had it set up in the first place.  Maybe it isn't much different.....

March 2019, after tensioning, and after altering tilt


And just in case this might offer any further help, here it is with a spirit level on top. Pity I never took a photo like this when I first got it as that would have made for a proper comparison.


March 2019, after tensioning and after altering tilt

I am now a much happier bunny and looking forward to long trips on this bike again!