Thursday, February 4

A jumble of recipes, walking and sewing (in that order)


In my last post I mentioned two favourite recipes, a chocolate cake and flapjack. I've since made both again and here are the recipes, plus another one for a nut loaf/nut burgers.

First up, the flapjack recipe. To give credit where credit's due, it comes from the York Wholefood Restaurant Cookbook , which my sister gave me in 1981. Having been at York University she knew this restaurant. There is no publication date inside, but I would describe it as a very 1970s type of wholefoodey recipe book!
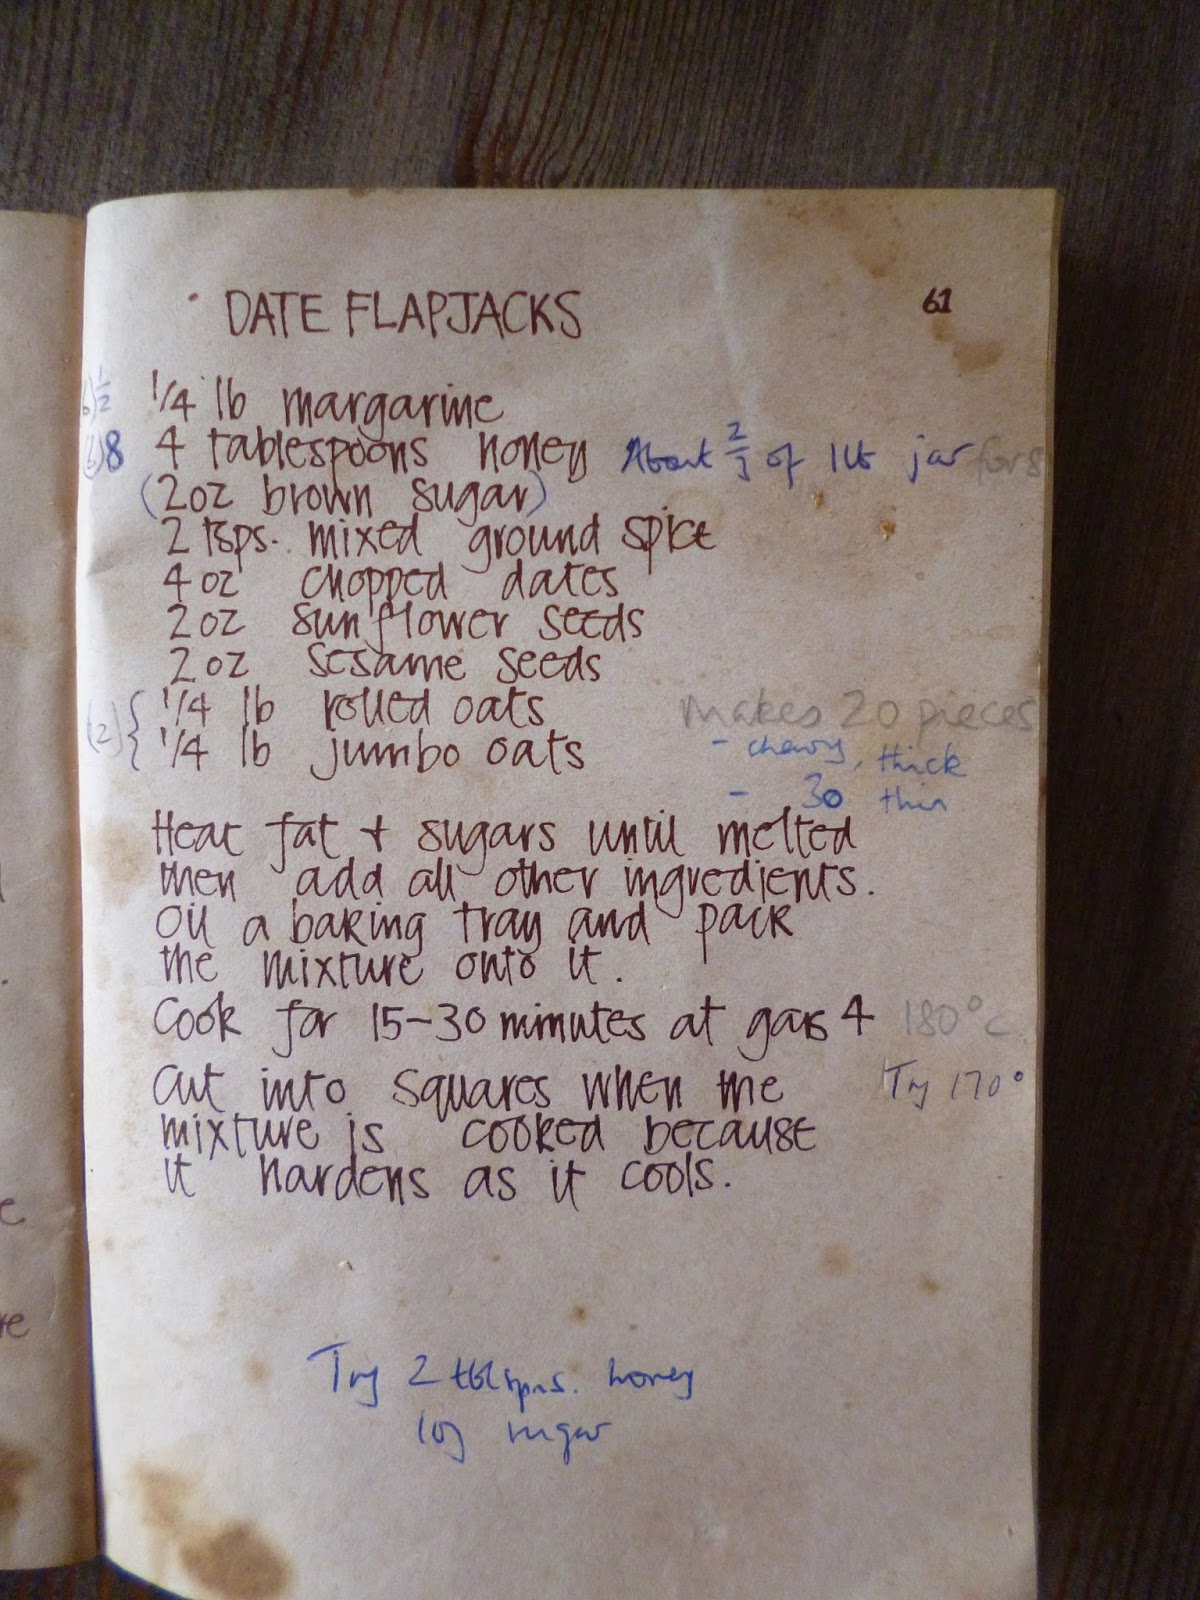
As you can see from the food stains and annotations I've made it quite a lot. I think it is excellent for taking on cycling trips, providing the sort of necessary nutrients that you need for energy. I have tried missing out the sugar but I do include it now whenever I make it as I find it all holds together better. You can vary what goes in, e.g. this time I hadn't got enough dates, so I added cranberries, and a few figs, although I have to say I prefer it with the amount of dates the recipe says.


Looking for the easiest chocolate cake recipe ever, with little washing up? No greasing or lining of tin? Even mix it in the tin? Look no further!! It's called Wacky Cake and is taken from the Dorset Farm and Country Holidays Cookery and Country Pursuits book, which we bought on holiday in 2004. It is unbelievably easy and is lovely as cake or as a pudding. I love it with my elderberry sauce poured over it, plus cream.


This next recipe says Nut Burgers in my own recipe book (below) but I made it as a loaf this time. It does take a while to grate the carrots and do the breadcrumbs (I haven't got any electrical appliance to do the latter so just crumbled the bread by hand) but the end result is very, very tasty - quite sweet. This time I also added a grated parsnip. I think this recipe was from a Good Housekeeping book, possibly Cooking for Vegetarian Children, given to me by my late mum when one of my daughters was vegetarian for a while. I have always cooked lots of non-meat things. Once when we had family visitors (on husband's side) for a meal not long after we were first married, I cooked something with lentils, and because of this one of them later asked my husband (not me directly!) if I was vegetarian, as if anyone who ate such things must be vegetarian.... 


The nut burger mixture

Flapjack and Wacky Cake (and Deva Bridge yogurt maker in background - see below)

I actually got seriously interested in food when I moved to Bristol in the 1970s and worked in what was then George's bookshop at the top of Park Street. I think I was feeding myself a fairly good diet but I began to get some digestive problems (I won't go into detail but let's just say that there was some wind involved, and a need to spend a rather embarrassingly long time in the smallest room....) and so took myself off to the doctor. Now, this was the 1970s remember, and what was in dietary fashion then? You've guessed it, bran................. There was nothing physically wrong with me, so I was told to eat 2 tablespoons of bran on my muesli every day and see if that helped. Well it did, but it ruined my muesli! 

However, this triggered my interest in healthy eating. I learnt that "brown" bread wasn't the same as "wholemeal" and found a nice baker somewhere on my way to work that made the latter. I think Bristol was, and certainly is now, quite a foodey place. I read all sorts of books (obtained at discount of course) a lot of which seemed to go on about adding bran to everything and eating wholemeal bread, but many of which taught me about what we really need to eat to be healthy. I gave up on the bran after a while, and was fine, and indeed probably better without it. I now think, and I'm sure this aligns with modern dietary advice, that wheat bran is not the way to go to get more fibre in your diet, but that a good diet that includes lots of fruit and veg will give you all the fibre you need. And if you do want bran, oat bran is much better.


I read about the benefits of natural yogurt and started making it in a thermos flask and eating it every day on my muesli. I still make it - in a Deva Bridge yogurt maker, which is just an insulated container really, very simple, not electric - you can't get them any more. I also make kefir now, which is even easier to make and supposed to be even more beneficial than yogurt. [Why has this paragraph centred itself??]

A spell at agricultural college doing a course called National Certificate in Agriculture with Home Economics taught me a lot more, about health and disease in humans and animals, and the alimentary canal - what goes in at one end (the mouth) what comes out at the other (you know what it's called...) and what goes on in between! It's fascinating stuff!

More recently, I have got interested in what you need to eat in order to be able to keep going while walking and cycling. Something like the flapjack is definitely a good thing to take with you, and I'd rather make and take my own, as it's a lot cheaper and I know exactly what's gone into it. When I did a long ride last year, about 55 miles, I experienced a decided dip in energy levels about 9 miles from home, commonly referred to as bonking (oh go on then, have your giggle.....now be quiet and read on). My husband had joined me for about half the distance and at this point I said to him "I've got to STOP HERE. No I cannot carry on even though it's downhill all the way to Lambourn!" (where I could buy more food). At that point I rested, ate more of the fruit and nut mixture I had with me (wanting more of the fruit than the nuts) and drank more water, and then we cycled on and in Lambourn I bought chocolate brownies and orange juice, and rested while I ate it. I would never normally eat that combination of foods, but I instinctively felt that that was what I needed, and after that I was OK on the 6 miles home. It made me think about what to eat, and when to eat it, on a long cycle ride.

1000 mile walking challenge (over at Life after Money here):

 I am doing fairly well with the 1000 miles walking challenge. I am going out nearly every day and mostly I do an hour's walking which is about 3.2 miles. I tend to sew in the morning when the light's good, have lunch and then go out. Sometimes I go further, for instance walking to town (just over 5 miles away, takes about 1 1/2 hours) to go shopping, and then coming home by car with husband on his way home from work. I do have to force myself out sometimes, as I find I get bored with the same routes and it is quite difficult to think of new ones of roughly the same distance. It will be better when the local footpaths are not so horribly muddy. And talking of mud, I made these gaiters a long time ago but have only just started using them. 


I made them from the sleeves of a waterproof coat that I found one day - the cuff is at the bottom and I put elastic through a casing that I made at the top. I have used them a lot, to prevent my trousers getting muddy, but I have discovered that once my legs warm up they get sweaty inside, probably because the fabric is just a cheap one, not like the more technical stuff you can get. So I'll be trying to dream up a way of making something (cheaply) more breathable. I would also make them so that I can fasten them round my legs, rather than having to pull them over my feet.


For some time I have been using the website Strava to upload my walks and rides to (my elder son got me onto it) and if you are a fellow user you can follow my walks, as I have now added a Strava widget to the left sidebar. [Note: Adding widget has gone wrong, will try again another time!] Warning - you can get Stravaddicted! My soon to be daughter-in-law refused to use it for a long time but then my son gave her his old Garmin watch thingy, enabling her to upload rides and runs to Strava, and she is now Stravaddicted.... I did get a bit Stravaddicted when I first got my Garmin cycle computer, trying to beat people on segments, but then I gave up being competitive and just thought - "oh whatever! I just want to enjoy cycling and I don't care if other people are faster than me!" Mind you I do still get quite a thrill from knowing that sometimes younger people than me are slower.......

Rubbish!

On several occasions over the years,  I have reported dumped rubbish that I see on my walks to a contact on the council. Yes, I have my own personal rubbish contact on the council. Me being the curious person that I am I poke about amongst the rubbish seeing if there's anything interesting there, and if there's anything to identify the dumper I then photograph everything and send the pic to my contact, who then takes appropriate legal action. I have also on two occasions found stuff that was the subject of a burglary. So it's definitely worth being nosey!

Sewing jobs

That is, the paid ones, are continuing to come in regularly - indeed this winter they have not slowed up as much as last year. The army job (sewing on hundreds of badges) has not come in yet as apparently the badges have not yet arrived. I have heard a rumour that this is not unusual for the army...

A customer asked me to shorten some salopettes - very tricky to get it right. I had to tack the layers of fabric first to keep them in the right place while I did the tuck. There was an inner lining below the knee, so I had to do the tuck above the knee. I got them the same length but the tuck isn't in quite the same place on each leg.


Inside of salopettes showing layers tacked together


Salopettes finished

 I also shortened some lined waterproof trousers for the same customer. Not a difficult job but the fabric was the sort which feels horrible to my winter hands i.e. rough!


I made this purse from an old pair of my shoes! They were a pair of the mocassin type that became uncomfortable so I cut the backs off to wear them indoors (I hate slopping around in slippers), but they still weren't comfortable so then I cut them up completely and made this purse from some of the pieces. It's what I call an emergency money purse - one I would take with me on a bike ride or walk when I don't want to take my normal full-of-money-and-credit-cards (oh yes!) one with me. 


Below is the back. In order to stitch these two pieces together, and so that the top could fold over the front,  I had to do a line of blanket stitch along each corresponding edge and then stitch in and out of the stitching to hold them together. Hope that's clear.... I used an ancient reel of linen thread that I had acquired from somewhere. The stitching is not very neat or even but it does the job.

Back of purse

I cut a slit in the flap and inserted an old jeans button in it, and then cut another slit in the flap as a buttonhole. And Bob's your uncle, an emergency money purse made out of an old pair of shoes - complete with stains!
Front 

And I mended these jeans. The story here is that my husband brought home 4 pairs of a colleague's jeans, all with holes in the crotch/rear area. I did one pair and then Husband took them back to his colleague to get his verdict and see if he wanted me to do the other 3 pairs. He did not want an obvious and visible mend in that area.....


Before. Small hole to right below pocket as well.

 I cut patches to fit the area, matching the direction of grain of the patch to that of the area to be patched, then zig-zagged them round the edges to stop fraying and sewed them in place, round the edge, on the inside. The red lines were where I had drawn the shape before cutting!

Zig-zagged patches sewn to inside


There is a "patching" stitch on my Bernina that I could have used for the darning on the right side, and would have done if I hadn't been trying to do my best and neatest job, but instead I used a straight stitch, going back and forth several times over each area. I was pleased at how it all turned out. Husband came home after taking them in to his colleague and wound me up by making out that he (the colleague) wasn't impressed, but in fact he was very impressed I believe! He wants the other 3 pairs done. 

A note on what I'm charging - I told Husband, give him an estimate of £10-£12 per pair. Husband came home and said I'd said £8-£10. No I didn't! Yes you did! (etc. etc.) (I'll write it down for him next time). Anyway, colleague is getting them for £10 per pair. Going by the time it took (I charge per hour for some jobs, £8/hour) it should have been £12, but never mind.....at least this bloke will be getting the message that it's worth mending things!

Finished mends

Now I'm off to make Husband's sandwiches, so until the next time, cheerio, 

Lizzie


Friday, January 8

Cot quilt - for new granddaughter!


I had various to-do lists pinned up in our kitchen before Christmas, concerned with Christmas dinner, arrival of expected grandchild (due on 18th), getting bedrooms ready for eldest son and fiancee who were coming to stay on 28th for 6 days, household sewing jobs plus the ones I get paid for (which unlike winter last year kept coming in), knitting cardigan for grandchild, and all the normal everyday stuff. In my head, as usual, I was thinking "What if I forget something? What if I don't get everything done?" I'm a great believer in lists though, and having made several nothing got forgotten. Those having Christmas dinner here could have been -

Maximum, if baby born

a) Husband and self, two daughters, two sons-in-law, youngest son, teeny tiny baby

Minimum, if baby born but it and its parents didn't come to dinner

b) Husband and self, elder daughter and son-in-law, youngest son

In between

c) Husband, self, both daughters (one heavily pregnant), both sons-in-laws, youngest son


Well, it turned out to be "b", as said grandchild turned out to be Lily Eva, who made her way into the world on Christmas Eve at 6.30 in the morning, weighing 6 lb 9 1/2 oz. Her parents, my daughter (no. 3 child) and her husband had had a lot of worry in the last couple of weeks of the pregnancy, over high blood pressure and low blood platelet levels (I don't recall them even being measured when I was pregnant), so when Lily finally arrived we were both overjoyed and relieved. It was the best possible timing for husband to have the luxury of Christmas Day, Boxing Day AND the next day off - first time ever in 12 years of working in a Tesco warehouse (rarely even gets Boxing Day off). I immediately got a surge of energy and went into cooking mode, making chocolate cake, healthy-for-new-mums-and-also-cyclists flapjack, and quiches (cheated, by using bought pastry). I will post recipes for the first two if I remember (must add to another list...).

We spent the evening of Christmas Eve in the hospital, gazing at and holding the tiny scrap of humanity that is beautiful Lily, instead of the usual activity which would have been to prepare the veg etc. for the next day (one of the routines we have got into over the years). On Christmas Day I had to make sure I had dinner ready for as close to 1 pm as I could (I think it was 1.15 in the end) so that elder daughter and husband and youngest son could get to the hospital (19 miles away) in time for afternoon visiting. So we had none of the usual post-Christmas dinner laziness. We proud grandparents went again that evening....

Elder son and fiancee arrived on Monday 28th, from Germany via the US (daughter-in-law to be is American). By that time mother and baby had come home and Lily was passed around her aunties and uncles and hundreds of photos were taken.....

And now that Lily has arrived I can do a blog post about her cot quilt!

But before that I can't resist posting just one photo of our beautiful granddaughter......sigh.......!!


A slightly blurred pic of  Lily, staying fast asleep while Mummy puts on the cardigan I knitted her (more on that later).


 So, on to Lily's quilt. I did it over a period of several weeks, in between other sewing jobs, and all that pre-Christmas stuff. The pics of it aren't as good as I'd have liked, even after a bit of editing. Will try harder.....

I should say here that I have never made a quilt before. I knew roughly what one should do, like have a top, some wadding, and a backing and some binding round the edge. and stitch it all together, but sometimes it's better not to know all the "rules" and just go ahead and do it anyway. (I'll leave the prize winning quilts to my older sister.) I'm pretty sure that it will survive machine washing. We didn't know whether "it" was a boy or a girl (her parents opted not to know, much nicer that way I think) so I was going for mainly soft neutral colours.


Quilt top, pinned to wadding (blanket)
The quilt top is made from old and new (the new bits are pre-shrunk of course) scraps of cream and white cottons, including bits of my own wedding dress material. If you have looked at the cot pocket I made (here) you'll see that this quilt is very similar. I liked the whites and creams, and also wanted to put in some fabrics that I can point to when I babysit and say "This bit's Grandma's old blouse, this bit's Grandma's wedding dress.....". I used the same technique as I did for the cot pockets, i.e. stitching lots of large pieces together in one long strip, then cutting it in half widthways, stitching the two pieces long sides together, and then doing several more cuts and stitching until I had a size and shape that was roughly suitable for the cot. Daughter says it's a good fit!

I then hand stitched the top to another piece of cotton (can't remember exactly what now, but probably calico) and then began the process of doing running stitch round all the shapes. I picked colours from the paper that's on the nursery wall. I developed a very hard patch on my middle right finger! (I never use thimbles.)

I did think about using new wadding but I really wanted to re-use fabrics as much as possible, in the old tradition of quilting, so I used some old-but-good wool blanket instead. I pinned the top to the blanket and then quilted from the middle to the outside in several rows in each quarter. By the way, my other sister gave me the quilting pins years ago and now I have finally put them to good use!

I trimmed off the blanket edges afterwards, level with the edges of the quilt top, trying to get the corners of the whole thing as square as possible. 

I did use new fabric for the back - brushed cotton (again washed first), as I particularly wanted it to be cream and I hadn't got anything suitable. I realize that the proper way to do things is to quilt the three layers together in one go, but I didn't.....so I then quilted the back to the other layers. 

I made the binding from some cotton I had in my stash (a lovely crossweave from the Organic Textile Company) which matched very well. I measured and pinned and tacked and stitched it all with great care (my Singer 201 handled the layers very well) as I was terrified of mucking it up at this stage and it all looking a very amateurish mess. That included being particularly careful with the corners. I machined the binding to the front and then hand stitched it to the back. 

And here is the finished item, on the kitchen table. I could have cropped the pic to get rid of the empty spray vinegar bottles but I thought I'd be real about what's in our kitchen. (But I won't mention the slugs that like to come in through the air vent. At least I think that's how they get in.)


Finished quilt

Detail of stitching
Sorry, the pics really are a bit rubbish.

I'm quite proud of my corners.....


I embroidered a label for the back with her name and date of birth.

The cardigan - that is a Debbie Bliss pattern, called Classic Cardigan. I used a merino wool mix. After I'd finished it I thought "Are babies really this small?!"  Well, yes, some are! I'm not the world's quickest knitter, at least not with anything more complicated than a hat, so I need to start the next size up NOW. Talking of hats, I knitted two before Christmas, one for my future daughter-in-law, and one for me, because by then I had decided that the pattern was so simple that I could run up another one quickly and without having to concentrate, and I like having a bit of knitting to do on winter evenings. This was the pattern I used - Knitted Rolled Brim Beanie.

Last month I got myself a sewing job that will be quite a test, but I hate turning anything down! And it's all good experience! It is - sewing about 360 badges onto army shirts..........more on that in the next post!

Oh, and on another subject completely, I have signed up to try to walk 1000 miles in 2016, via this blog Life after Money. Every day after lunch I am trying out different routes of about 1 hour/just over 3 miles. This will be on top of cycling miles. I am also running up and down our stairs a few times a day, and jogging on the spot while the tea/coffee brews. Maybe I'll do a separate page on all that (add it to the list, Lizzie....).

So, lunch now, and then off out in the sunshine!

Lizzie


Saturday, November 28

This Month I have been Mostly doing.... Mending, and a bit of altering

This is actually rather a long post. If you like reading about mending read on, if not, better go and do something else.....


First there were the cardigans, which was the altering bit. I bought two, the same style, one pink and one blue, in a charity shop for £1 each. This was the blue one -


Both cardigans are in very good condition. I'm definitely a wool person and if I was buying new (or knitting it myself) I'd want more wool than this, preferably 100%, but for £1...... Enough to keep me warm - ish. I would guess that it is probably 80s or 90s, judging from the label. It's certainly a long time since I saw a Littlewoods shop.

The problem with them was that the neckline was quite high, and when I wore them the top edge made my neck itch. How to remedy this? First I got a strip of old t-shirt and used it to line the inside of the ribbed section, but unfortunately I could still feel it scratching me right on the top edge. I thought about doing it again and making the jersey go slightly over the top, but I thought that might look daft. Dare I do some chopping? Well, if I wanted to wear these cardigans then that was the only answer. So I cut off the top ribbed bit, but before I did that I sewed all round, through the stitches, just below where I intended to cut, to stop (hopefully) the stitches running.


Then I did blanket stitch all round, and Bob's your uncle, one warm wearable cardigan for the winter!


(I just put that old cotton reel in for interest. It's an old make I've never heard of. I've got quite a lot of old reels of cotton - some I use for tacking and some I dare to use in the machine, despite some people saying that you shouldn't use old thread in your sewing machine.) Anyway, this is the finished cardigan. The neckline is a bit wavy but I don't think that matters.

And this is the pink one. (Husband loves this colour on me but hates the blue one!) When I was little I would never have worn pink, thinking it was too girly girly, but when I got to about 20 I decided I liked certain shades of pink and that they suited me, and now it's one of my favourite colours. 


Now on to a bit of mending for a customer. This particular one is quite a regular - I have done a lot of mending for her. The sort of person that one might describe as "well to do".  What I like about a lot of such people is that they appreciate good clothes and household linen and get it mended when it needs it. I darned her husband's wool cardigan, which I think she said he "wears round the house now". 

Here's the major hole before darning. Incidentally I use embroidery thread where a fine thread is called for, because I don't know whether VERY fine mending wool exists, e.g. suitable for merino wool garments. I have not found any. One of my other customers has a box choc a block full of really good quality mending wool, which she gives me to use for her mending, and none of it is fine enough to use for this sort of garment.


And after mending.


Another of the many holes....(It really is the same cardigan! I don't know why the colour is not accurate here) -


And after


And now on to trousers for the same lady's husband. These were a pair of chinos with some minor wear and tear type of holes. I use woven cotton iron-on interfacing for this sort of repair - I iron it onto the back of the hole/rip and then stitch over it on the right side, in this case just using a straight stitch.


Again the colour's not very accurate -


And now, my piece de resistance...... (apologies here to any French readers for the lack of accents. It might be very offensive, just as missing apostrophes are to moi! And Liz Truss. And John Humphries. I know there should be two in there but I have yet to learn how to put them in on the computer. I have the same problem with umlauts when using German words occasionally to my son in Germany) -

MY FAVOURITE JEANS

These jeans are at least 5 years old. This first photo shows some mends I did, ooh, maybe a couple of years ago. Recently I had begun to get worried that the jeans were getting so thin in places that if I wasn't careful I would be walking around one day unintentionally revealing what was underneath.....and given that some of the most worn bits were around the backside, well, that doesn't bare thinking about. I decided that they had had it, and were only fit for cutting up and making into something else, but then I thought about how much I liked these jeans, and surely if I did quite a LOT more patching and stitching.......

By the way I like the idea that a garment isn't finished when it's finished, if you get my meaning, but that it continues in its development after this, when someone mends it, or alters it. I think I read that on Tom of Holland's blog (if you want to see some amazing mending, go there). So I am continuing the development of my jeans, as it were.


Detail of one of those original mends.


Another detail


 This is what my jeans look like now - and I'd just like to add that the other day, in a shop, the assistant was very complimentary about them and when I said I had just finished mending them, she said she thought I'd bought them like it!

Again I used embroidery threads, usually two strands. Fortunately I have a big stash of them, some bought and some acquired from I can't remember where!


This pic shows the inside after I had ironed on lots of the aforementioned interfacing over the thin bits. My intention at this stage was to do lots of stitching over the worn bits. 


Here I have done some stitching, on top of the denim, and below on the dark blue patch, which I had machined on. This patched bit is along the lines of Japanese boro mending - if you haven't come across this type of mending then have a google. I love the look of it, especially with all the indigo fabrics they use. Oh, another thing to mention is that I undid the inside leg seams to make all this mending much easier.


In the pic below, you can see hand stitching (red, yellow etc.), under the patches. And a non-patched stitched pink rectangle. I have to admit that I had to give up on the idea of close hand stitching (for strength) all over every thin bit - it was taking ages and much as I loved doing it I wanted  to be able to wear these jeans in the not TOO distant future. So I added the patches (bits of old shirt), and then did hand stitching on top - with the patches strengthening the fabric the stitching didn't need to be quite so close together. 


Detail of pink bit.


And here is the back of the jeans. The two patches to the left I hemmed first, but the one on the right I didn't - it's got raw edges. In images on the web the boro seems to have raw edges (I would love to see some in real life). I do like raw edges and wish I'd done all the patches like this but I only thought of it halfway through. Of course it may be that the raw edges will fray too much when washed but we'll see.


And finally, blanket and running stitch round the pocket, and random darning behind it.


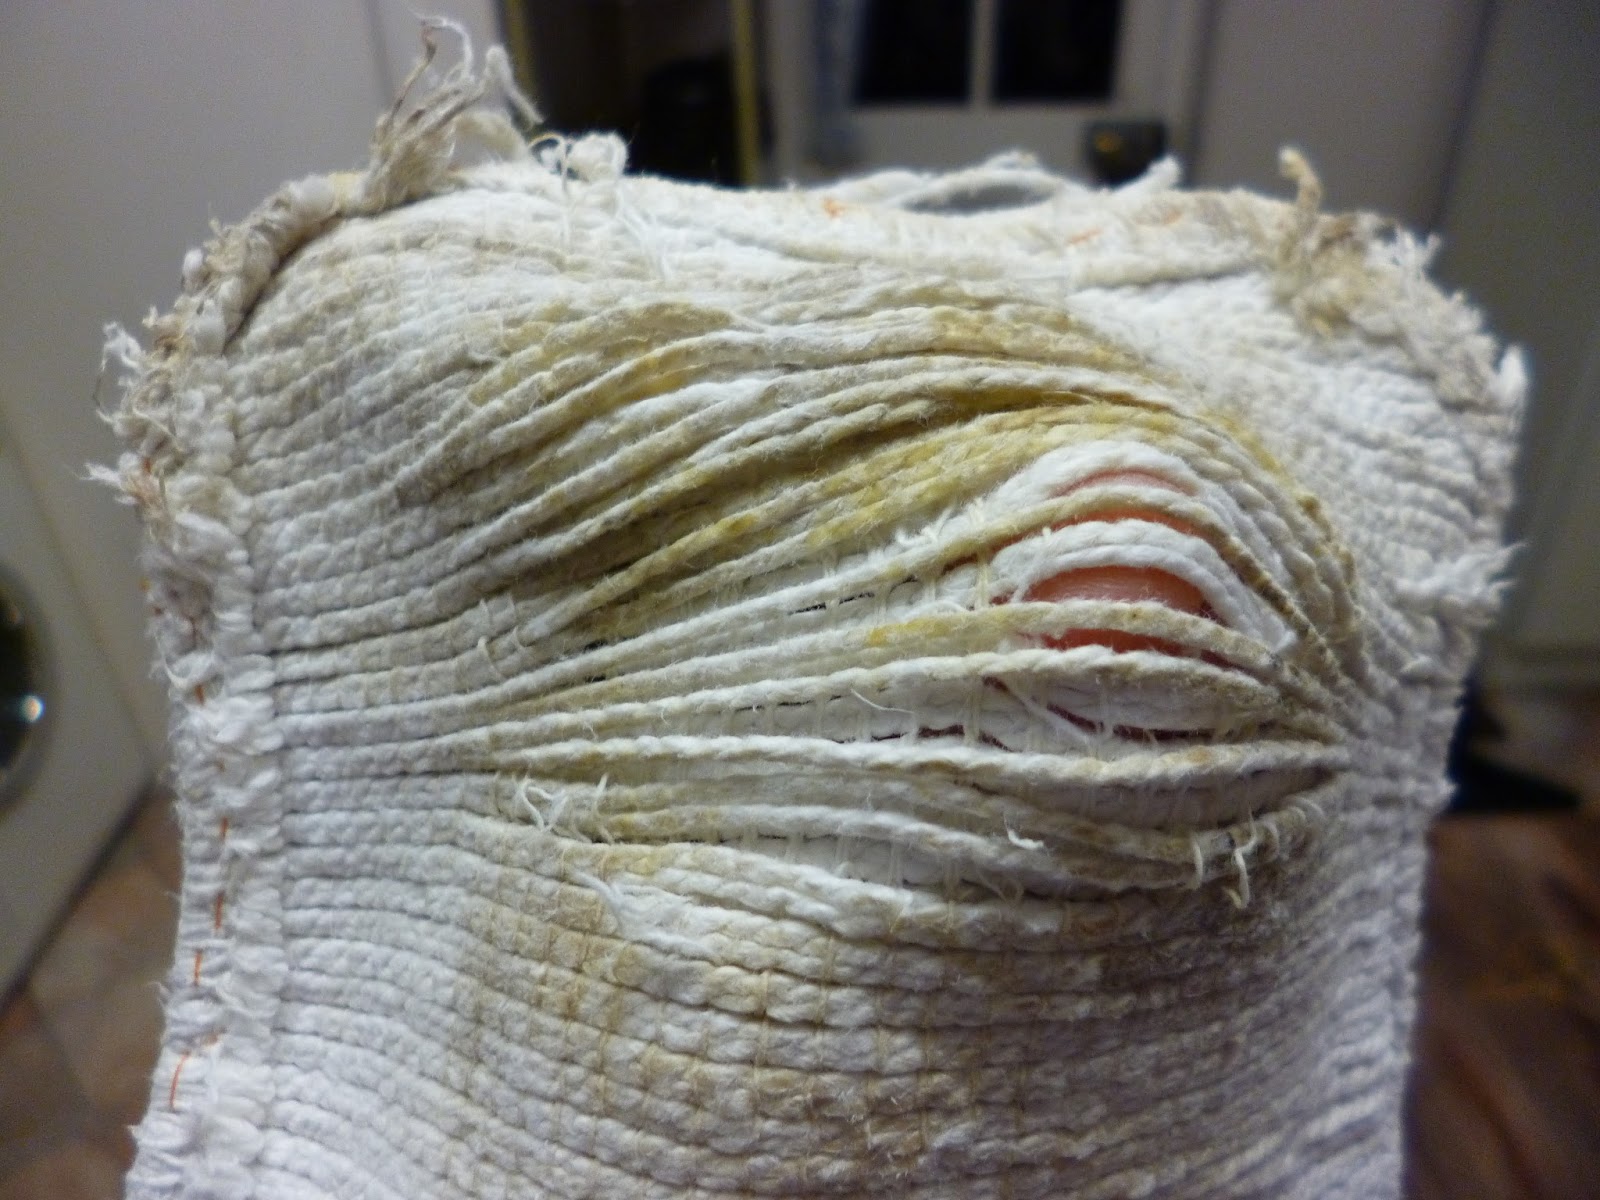
I really have been on a roll with the mending lately, so much so that when I finished the jeans I was looking round for something else to mend, and here it was - oven gloves! I should say that these are actually CLEAN - fresh off the washing line in fact, just stained. I do have a talent for getting stains out of things (another post perhaps!) but really I don't think stains on oven gloves matter. 

I had already mended these 4 years ago (yes 4!), using another pair - hence the hand stitching round the edge. I was going to patch them but then as I was standing at the kitchen table waiting for something to cook (it was tea time) I looked at a cone of very thick cotton thread that happened to be there amongst my sewing stuff (I do have a sewing room but I tend to do a lot in the kitchen too) and thought "Ah! some weaving perhaps!"


You can see that one might burn one's fingers......


So, weave away I did.


Both ends done.


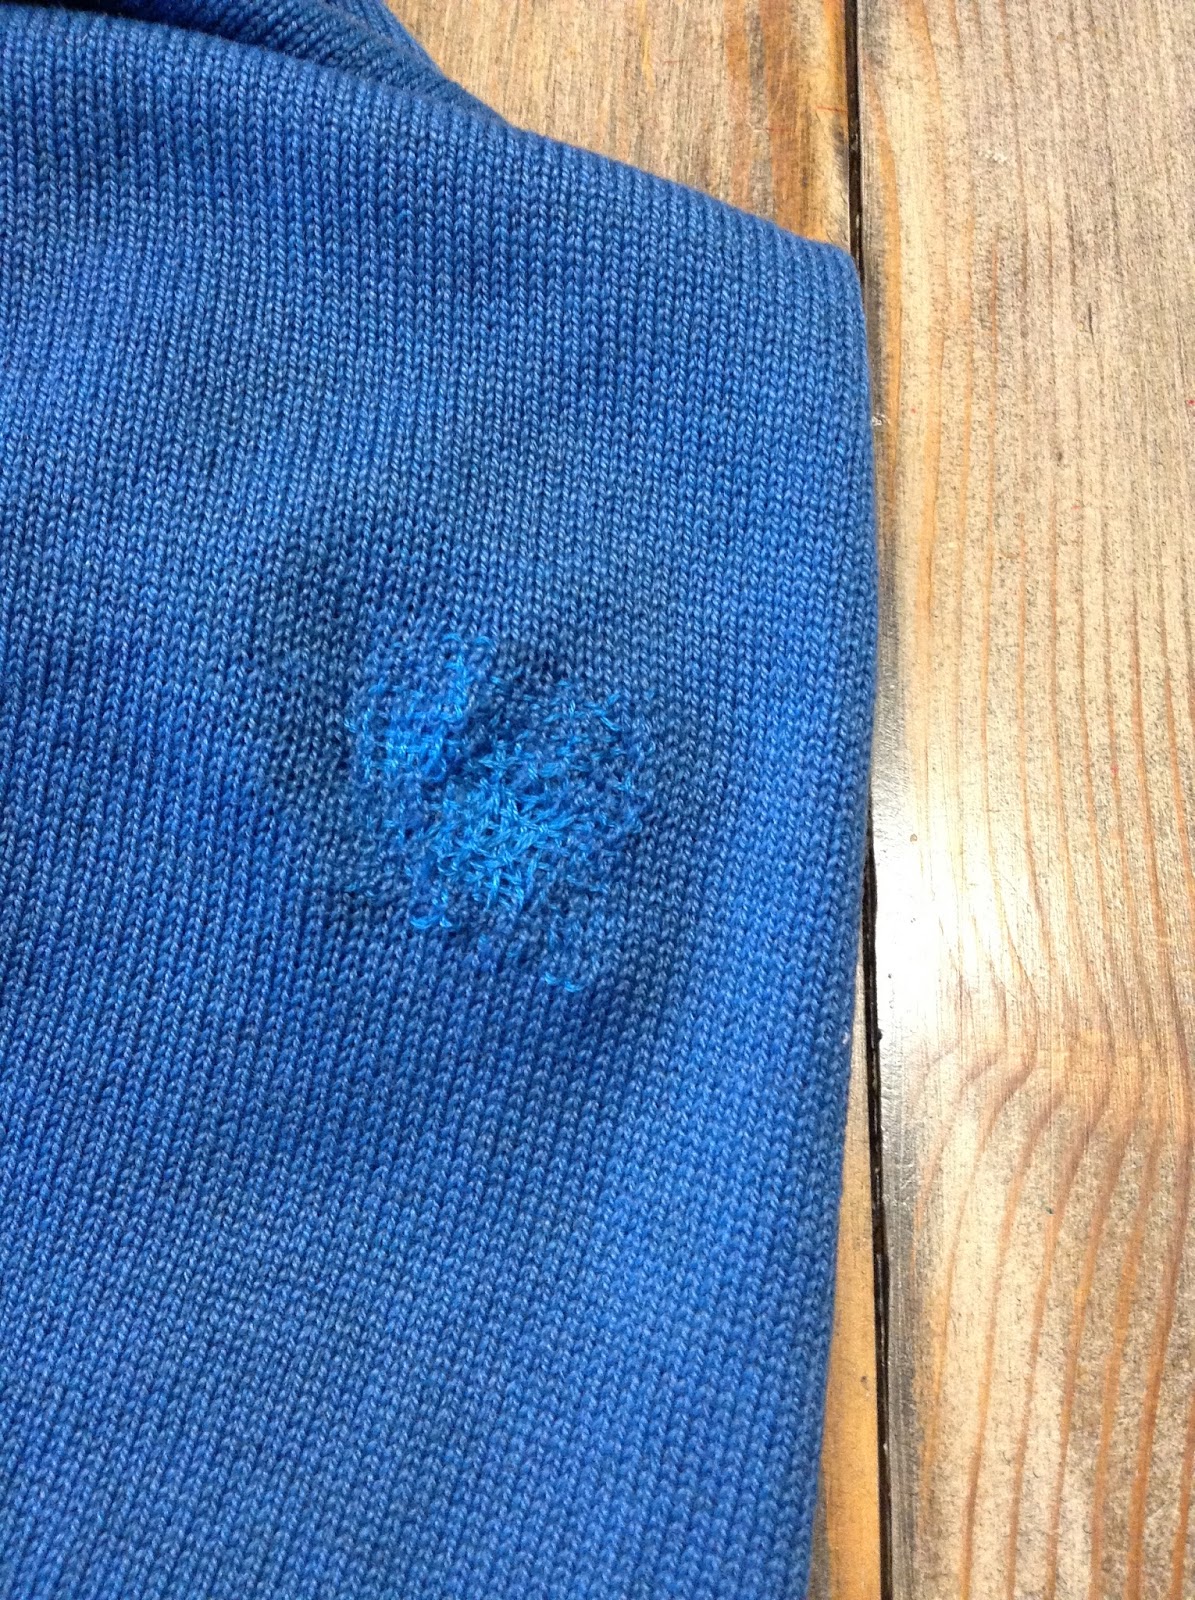
One last pic. This is my husband's favourite jumper, which I bought him in a charity shop. It has at least 6 darns - this is the latest one. This is very visible mending; fortunately he doesn't mind. In fact I think he's quite proud of my darning......


Is that an ending to my mending? Well, just for a while.Our own mending alone (apart from what I do for other people) is never ending really, but I don't mind, because I really enjoy both the doing of it, and the satisfaction that comes of making something usable or wearable again.

And so to bed, but first a question - have you mended anything lately?? Or got something tucked away waiting to be mended??!!

Lizzie